The Bathroom of Betrayal and Subsequent Breakup. I wanted a small win that felt big, so I started a pink bathroom remodel right where all the ugly crying happened. Stay with me, because this tiny room turned into the loudest pep talk I own, and I swear you can steal half these moves.
pink bathroom remodel
I’m not the person who takes big risks. I label bins and keep neutral towels so everything matchy. Then life blew up, and I needed a space that didn’t feel like a gray cloud. The bathroom was the grumpiest spot in the house, so it got the attitude shift first. I picked a bold pink, added board and batten, layered wallpaper with giant leaves, and swapped tired lights for warm pretty ones. It sounds dramatic, but honestly it’s just a bunch of doable steps stacked on each other with coffee.
Before: the gray cave that made me sigh
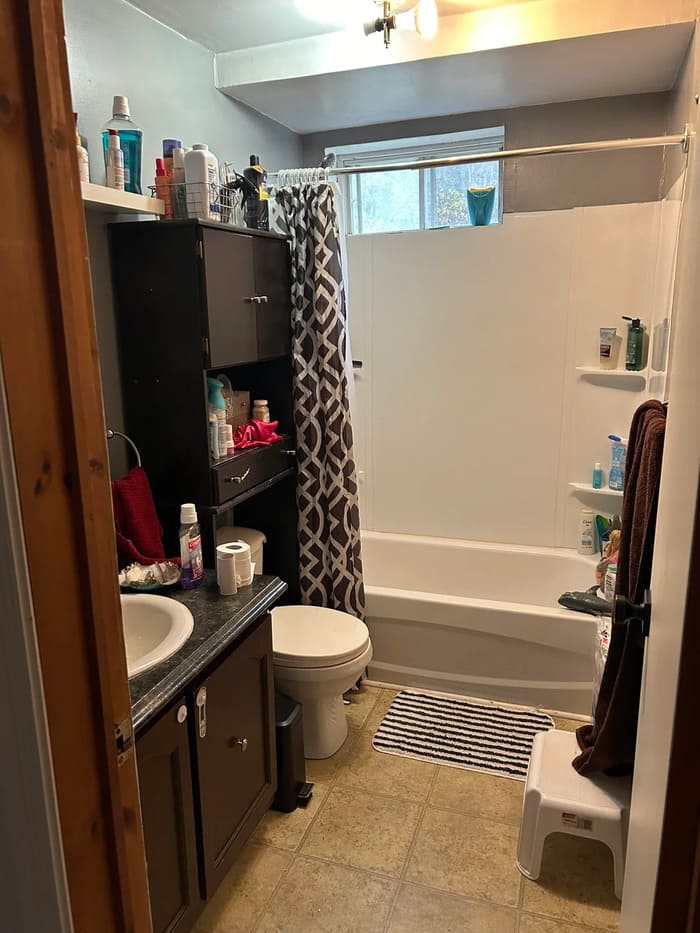
The first three photos are the old bathroom, bless its functional little heart. From the doorway you can see the layout straight away. Sink on the left, toilet center, tub at the end. The ceiling beam sits low and there’s a small fixture with two bulbs that threw yellow light but not enough of it. The window over the tub is cut by the shower surround so it looks short and awkward. A white tension rod hangs across with plastic rings and a heavy gray patterned curtain. The floor is beige vinyl tile that hides dirt but also hides joy.
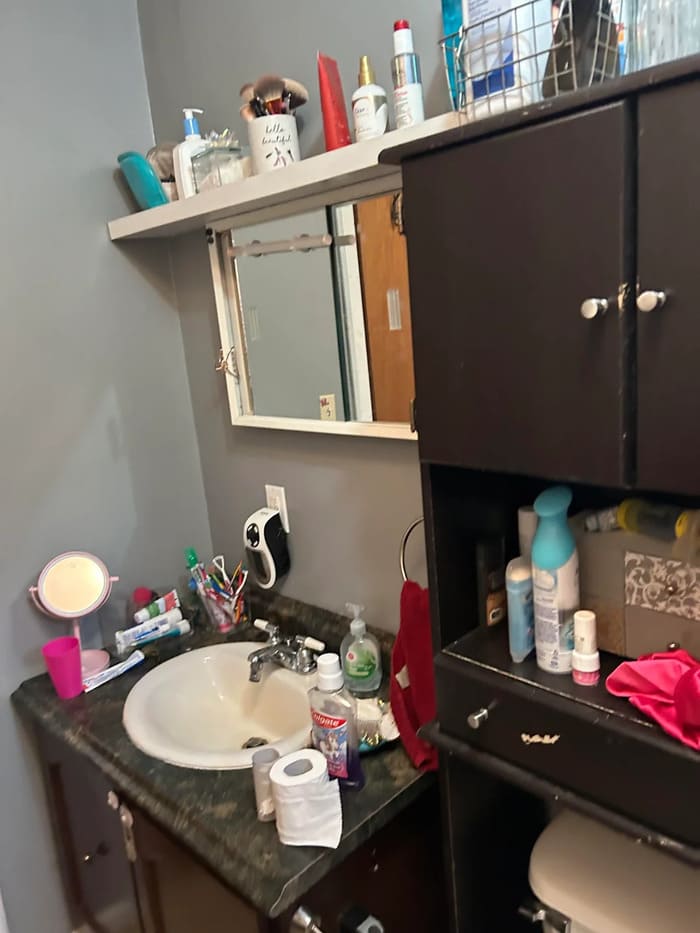
On the left sits a dark espresso vanity with a dark fake marble counter. The round sink drops in and hogs space. Above it a tiny mirrored cabinet is squeezed under a long shallow shelf that became the land of lost bottles. The close-up shot shows toothpaste tubes, a pink cup, brushes, a wire bin, and a little mirror, all sitting shoulder to shoulder like they pay rent. Next to the sink lives a tall over-the-toilet cabinet in the same dark color. It crowds the towel ring, so your hand bumps wood every time you grab the towel. It worked, but everything felt cramped and cranky.
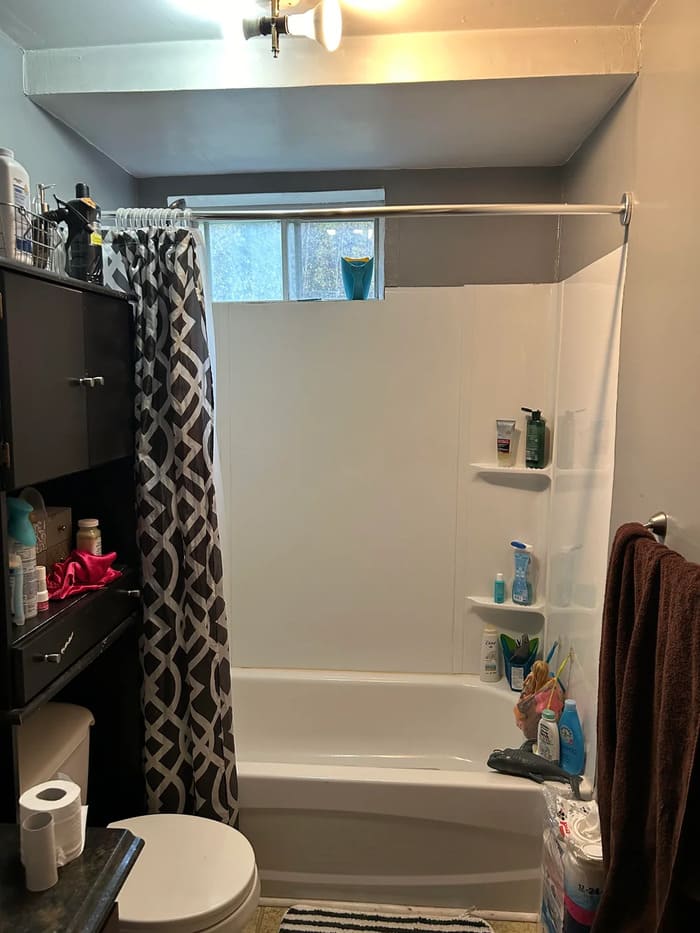
The tub area in the third photo is plain white with corner shelves glued on. Bottles collect in every pocket. A step stool hangs out by the toilet because it has nowhere else to go. The brown towel on the right makes the room feel heavier. I didn’t hate it, I just didn’t feel anything, which is almost worse.
After: tropical cupcake energy and actual storage

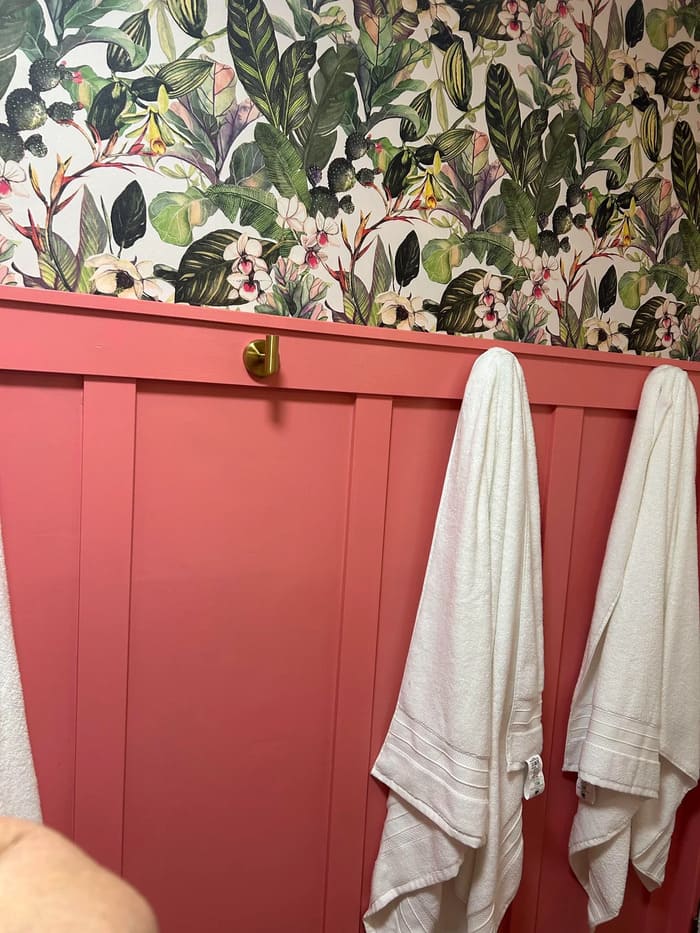
Boom. The lower half of the walls got board and batten painted a punchy pink. Above that I used peel and stick wallpaper with big leafy greens, little berries, and pale blossoms on a soft background. The line between trim and wallpaper acts like a belt on a dress. It keeps the pattern from running wild.
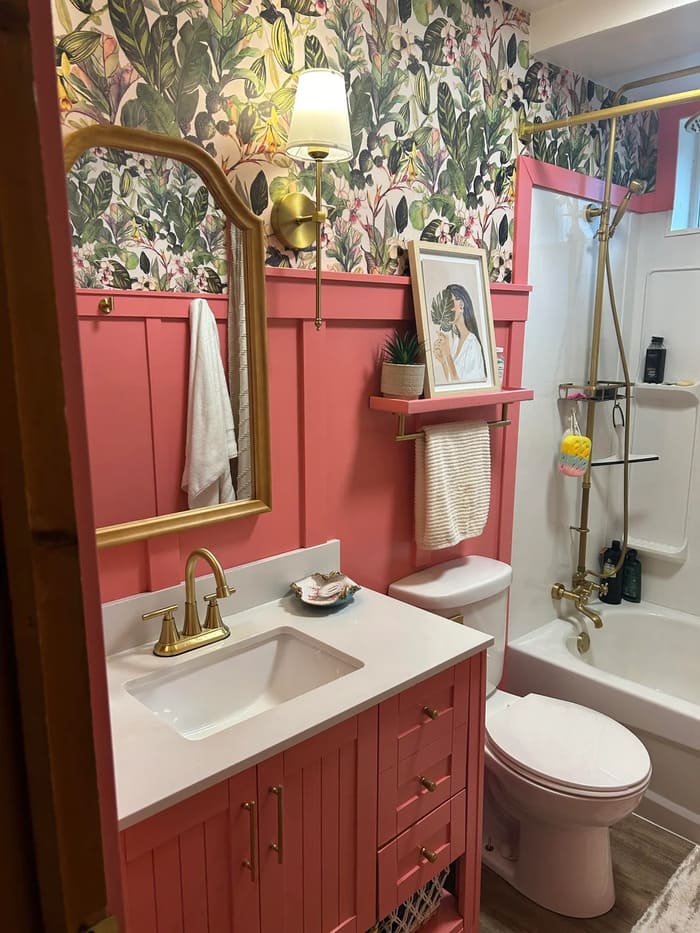
The vanity is new and also pink with beadboard doors, slim brass pulls, and a white quartz top that bounces light. The sink is rectangular so I get counter space back. Two brass sconces with linen shades flank an arched gold mirror. The light hits the face evenly, not from the top like a spooky campfire story.
I added a pink floating shelf with a tiny rail so the hand towel has a neat home. A framed print of a woman peeking behind a leaf sits above it, which makes me laugh every morning. The gold shower rod finally matches everything else, and it’s anchored to the wall so it won’t droop like before.
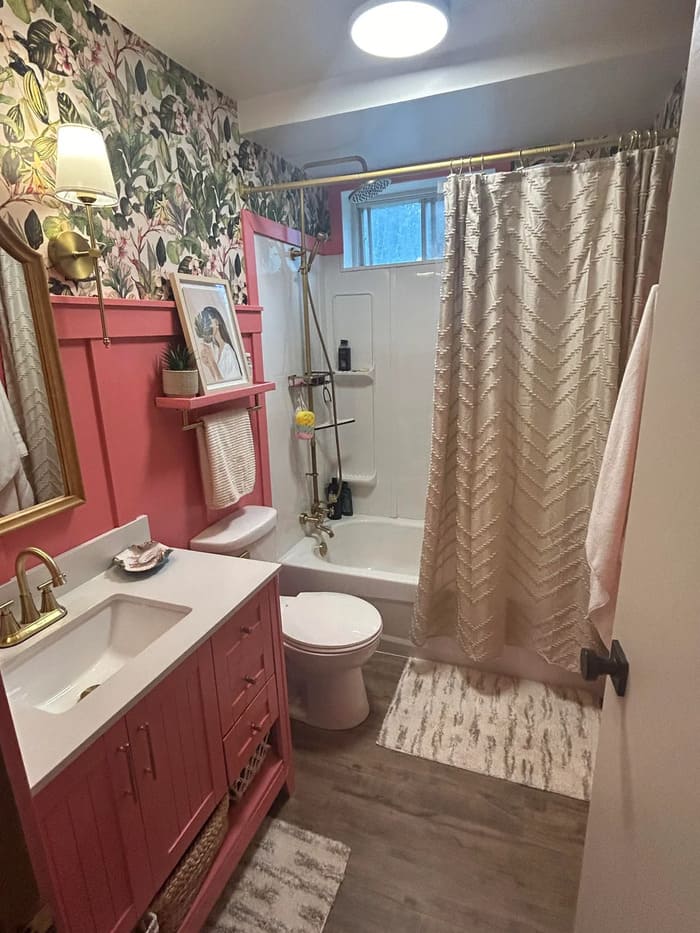
In the close-up, you can see the vertical trim pieces are spaced evenly which makes the room look taller. Brass robe hooks hold white towels that pop off the pink. The floor changed to a wood-look vinyl plank in a warm medium tone. It feels cozy and it hides toothpaste freckles like a champ. The last photo shows a bright new ceiling puck that actually lights the tub area. Soft patterned rugs in cream ground the floor and tie with the wallpaper without shouting for attention.
Why these changes work in a small space
- Color placement is everything. Bold color lives below the chair-rail line, while white stays up high. This keeps the top of the wall bright so the room feels taller.
Pro tip: In a small bathroom, put strong color low and light color high. Your eyes lift up and the ceiling feels higher. - Board and batten gives order. The trim creates rhythm. It’s like stripes for walls, but calmer.
How I did it: 1×3 MDF stiles, 1×4 cap, lattice to hide seams. I caulked every inside corner and nail hole. Yes it’s boring, yes it’s worth it. - Wallpaper but make it friendly. Peel and stick is forgiving. You can pull it off and try again without crying.
Pro tip: Start in the least noticeable corner. Line up the biggest leaves first, not the tiny berries, and use a hair dryer on low to soften and push out bubbles. - Metal finishes repeated. Brass shows up on the faucet, mirror, sconces, towel hooks, and shower rod. That repetition tricks the eye into thinking the room was designed on purpose.
Hack: If one piece is the wrong metal, spray it. Light coats, let it cure at least 24 hours before steam. Ask me how I learned that. - Lighting with intention. Two sconces keep shadows off my face and the ceiling puck brightens the whole room.
Pro tip: Choose bulbs around 2700K to 3000K for flattering warmth. Anything bluer makes skin look tired. - Storage that stays cute. The old tall cabinet is out. Deep vanity drawers now hold hair tools, skincare, and kid toothbrushes. Baskets on the open shelf carry toilet paper and washcloths.
Pro tip: Put a multi-outlet strip inside the vanity so the electric toothbrush and hair dryer charge out of sight. - Shower that feels like a treat. A rain head plus a hand shower makes bath time easier for kids and me.
Hack: If a full system is out of budget, just add a nice handheld. It cleans the tub faster and that’s priceless.
Step by step so you can copy it
- Clear the room. Take everything down. Label screws in snack bags so future you isn’t swearing.
- Patch and prime. Especially where the old cabinet left scars. Primer saves paint and helps pink cover well.
- Install trim. Find studs and nail stiles first. Use spacers or a scrap board as a guide so gaps are even.
- Paint the trim and lower wall. I did two coats, sanded lightly, then a final pass after wallpaper to touch tiny spots.
- Hang wallpaper. Measure, cut with a sharp blade, and change blades often. Trim around outlets by cutting an X and folding inward.
- Swap fixtures and lights. Turn off power at the breaker. Use a GFCI outlet near water if you don’t already have one.
- Set the jewelry. Mirror, sconces, hooks, shelf, art, towels, and a soap dish you actually like.
Tips I wish someone yelled at me sooner
- Sheen matters. Use satin or semi-gloss on the lower walls and trim. It wipes clean when toothpaste does what toothpaste always does.
- Ventilation counts. If you can’t add a fan, at least run a small dehumidifier for a bit after showers, or crack the window. Wallpaper lasts longer.
- Anchor the shower rod. Tension rods sag and fall at 6 a.m. when you are half asleep. Anchors save your morning mood.
- Sample first. Paint sample boards, not the wall. Carry them through the day to see light changes.
- Match heights. Center your mirror and sconces to your eye level, not Instagram’s. Mine sit so I can actually see my whole face without tiptoeing.
Budget, time, and the messy truth
I spent two weekends and a couple late nights. The vanity with top was the biggest cost, then the brass fixtures, then wallpaper and trim. Doing the labor myself slashed the budget hard. The messiest part was caulking and sanding, which always feels endless. The most annoying part was cutting wallpaper around that shelf niche. I measured twice, still cut wrong, and had to patch a little sliver. You can’t see it unless you stick your nose to the wall, which please don’t.
What the photos don’t show but matters
- The quartz top is super easy to clean. No stains from hair dye or kid toothpaste art.
- The wood-look vinyl is waterproof and warmer than tile on bare feet.
- The white towels act like a pause button. With pattern and pink going wild, that white calms everything down.
- The window ledge now holds a little plant. Small life, big mood boost.
Steal this checklist for your own win
- Pick one bold color and repeat it three times. Mine is pink on vanity, trim, and shelf.
- Keep one metal tone consistent. Brass for me.
- Two light sources minimum. Overhead plus mirror lighting.
- Hide clutter with drawers and baskets.
- Add art that makes you smile, not just match colors.
- Use rugs with texture so the floor doesn’t feel flat.
- Finish with hooks for towels. Hooks beat bars for kids every day of the week.
Final feelings from the tiniest room
I started this because everything else felt out of control. Standing in this bright, silly, confident space each morning reminds me I still make choices. The room didn’t get bigger, but it got braver, and so did I. If you need a nudge, consider this it. Try your own pink bathroom remodel, or blue, or a moody green, whatever makes you feel like the main character. Start small, mess up a little, keep going. Your bathroom might be tiny, but the win you feel when it’s done is not.