So you finally decided to redo your bathroom, huh? But now you’re sittin’ there thinkin’, how long does it take to tile a bathroom anyway? Truth is—it depends on a bunch of stuff. Like how big your bathroom is, what kinda tile you pick, and if you’re goin’ for a simple look or somethin’ fancier. This article breaks it all down so you ain’t guessin’. I mean, no one wants their bathroom ripped up for weeks, right? By the time you're done readin', you’ll have a good idea of what to expect and how to plan it without losin’ your mind. Tiling sounds like a lot, but it don’t have to be scary once you know what’s goin’ on.

So, How Long Does It Take to Tile a Bathroom? Well… it depends.
Bathroom Size
Bigger bathroom = more tiles = more time. Duh. Small space? Might be done quicker. But don’t forget, even tiny rooms can take a while if stuff’s complicated. Here's a rough estimate to give you a clearer picture:
| Bathroom Size | Approximate Tiling Time |
|---|---|
| Small (20-40 sq. ft.) | 1-3 days |
| Medium (50-100 sq. ft.) | 3-5 days |
| Large (100+ sq. ft.) | 5-7 days |
Tile Type & Design
Mosaic tiles? Gonna take forever. Big plain ones? Way faster. And if you wanna get all fancy with patterns or borders—well, that adds hours (or days).
| Tile Type | Complexity Level | Approximate Tiling Time |
|---|---|---|
| Ceramic | Low | Standard |
| Porcelain | Medium | Standard-Extended |
| Mosaic | High | Extended |
| Natural Stone | Medium-High | Extended |
Preppin' the Surface
Can’t just slap tiles on anything. Gotta clean, fix holes, maybe rip up old tiles. That prep part? It’s lowkey time-consuming but super important.
Skill Level
Pro tilers? Fast and clean. DIYers? You’re probly gonna need more time (and patience). Mistakes = redoing stuff = more hours gone.
Extra Features
Wanna add a niche or shelf? Yeah… that's more cutting, leveling, and measuring. Looks cool tho, just takes longer.
STEPS INVOLVED IN TILING A BATHROOM
So, you're probly wonderin’ how long does it take to tile a bathroom, huh? Short answer—it depends. Long answer—well, let me walk ya through the whole thing so you ain’t guessin’.
1. PLANNING AND DESIGN (1–2 DAYS)
Alright, first things first. Before you start slappin’ tiles everywhere, you gotta plan it out. Like, figure out what kinda tile you want, how much of it, and where it’s all gonna go. Trust me, if you skip this part or rush it, you’ll regret it later. I usually take a day or two to just look at colors, measure stuff, and doodle the layout. Not hard, just time-consuming.
2. SURFACE PREPARATION (1–2 DAYS)
CLEANIN’ & LEVELIN’
You can’t tile on a dirty floor. That’s just facts. Gotta sweep, scrape, wipe—whatever it takes to get it clean. Then, ya might notice some spots are wonky or bumpy. You’ll need some leveling stuff to smooth it out.
RIP OUT THE OLD STUFF
If there’s old tile already, oh boy. That’s gonna eat up time. Took me like a whole day once just to rip off old tiles and clean the gunk under ‘em. If you’re lucky, it peels up nice. If not, well… grab a hammer.
3. MEASURING AND MARKING (HALF A DAY)
You don’t wanna eyeball this. Seriously. Measure the room and draw guide lines with a pencil or chalk. You’ll also need to mark out where plumbing fixtures are so you don’t tile over your toilet. Took me like half a day for this, mostly ‘cause I kept double-checkin’. Better safe than sorry, right?
4. ADHESIVE TIME (1–2 DAYS)
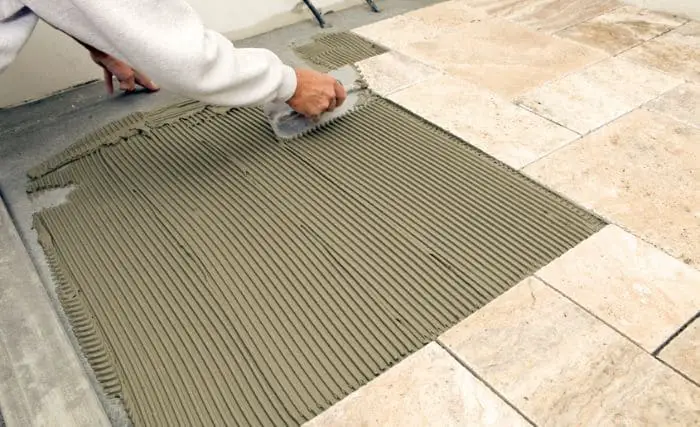
Here’s where things start lookin’ like progress. Get some tile adhesive and a notched trowel. Spread it in small patches, ‘cause it dries quicker than you think. Different glues dry at different speeds, so read the label. Or don’t, and hope for the best (I don’t recommend that tho).
5. TILE LAYIN’ (2–3 DAYS)
Okay now it’s gettin’ real. Time to slap them tiles down. Start at one end and work your way out, usin’ spacers between tiles so it don’t look all crooked. If you’re doin’ a basic pattern, might finish faster. But if you’re fancy and doin’ diagonal or mosaic styles… yeah, block off your whole weekend.
6. GROUTING (1–2 DAYS)
After tiles sit overnight, it’s grout time. Scoop that stuff in the cracks and smooth it out. Wear gloves, this part gets messy. Then, wipe the tiles clean and wait again. Honestly, not hard—just kinda boring.
7. SEALIN’ (1 DAY)
Last step, but super important. Especially if your tiles are porous (like natural stone), they’ll soak up water and stains if you don’t seal ‘em. Takes like a day to do and dry, but don’t skip it unless you like mold.
TIME MANAGEMENT TIPS
THINKIN’ OF HIRIN’ PROS?
If this sounds like a lot (it kinda is), you might wanna call the pros. They know their stuff and can probly finish in half the time. Costs more, but hey—less stress.
PREP MAKES IT SMOOTHER
Having all your gear ready (tiles, trowel, adhesive, spacers, etc.) saves a ton of time. Double check your measurements before buyin’ tiles. Ain’t nothin’ worse than runnin’ out mid-project.
BREAK IT INTO CHUNKS
Don’t do everything in one go. Tackle it bit by bit. Do a wall one day, a floor the next. Helps you stay sane and see progress without burnin’ out.
COMMON MISTAKES AND HOW NOT TO DO ‘EM
MESSED UP MEASUREMENTS
Measure wrong and you’ll either buy too many tiles (money down the drain) or not enough (ugh, another store run). Always round up and buy a little extra.
SKIPPIN’ PREP
If your surface ain’t smooth or clean, the tiles won’t stick right. Or worse, they’ll start poppin’ off in a week. Been there. Learn from my mistakes.
RUSHIN’ DRY TIME
Don’t be impatient. Let the glue and grout dry fully or you’ll mess the whole thing up. I know it’s hard to wait, but it’s worth it.
Estimated Cost Based on Time
Understanding the estimated duration of your tiling project can help you better manage your budget. Below is a rough cost estimate based on a medium-sized bathroom.
| Stage | Duration | Cost Range |
|---|---|---|
| Planning and Design | 1-2 Days | $200 – $500 |
| Surface Preparation | 1-2 Days | $300 – $700 |
| Laying Tiles | 2-3 Days | $1,000 – $3,000 |
| Grouting and Sealing | 1-2 Days | $200 – $600 |
| Total | 5-9 Days | $1,700 – $4,800 |
CONCLUSION
So really, how long does it take to tile a bathroom? If you’re DIYin’, anywhere from 5 to 10 days, dependin’ on your pace, bathroom size, and how many coffee breaks you take. If you get pros, maybe just 3–5 days. But no matter what, takin’ your time and doin’ it right means your bathroom’s gonna look awesome for years.
Now you got the lowdown—good luck and happy tilin’!


